基于GraphQL、express、MongoDB、Apollo、React.js的小应用。
->> 项目源码github传送门
内容包括:
- 如何搭建基于GraphQL、express、MongoDB的后台服务器
- 如何定义数据模型
- 如何通过GraphiQL测试query和获取的数据结构,包括query(查询)和mutation(更新)
- 如何搭建可以跟graphql query通信的Apollo-React前端应用
Server
环境
- express
- graphql
- mongoose,连接server和数据库(mLab)
- mLab,云端mongoDB
定义Book的Schema
1
2
3
4
5
6
7
8
9
10
11
|
const graphql = require('graphql');
const { GraphQLObjectType, GraphQLString } = graphql;
const BookType = new GraphQLObjectType({
name: 'Book',
fields: () => ({
id: { type: GraphQLString },
genre: { type: GraphQLString },
name: { type: GraphQLString },
})
});
|
定义RootQuery
- book的类型是一个Graphql对象类型
BookType;
- args是发起这个query时,需要传入什么参数,这里是
id;
- resolve是根据参数从数据库查询数据的逻辑。
1
2
3
4
5
6
7
8
9
10
11
12
13
14
15
16
|
const RootQuery = new GraphQLObjectType({
name: 'RootQueryType',
fields: {
book: {
type: BookType,
args: {
id: { type: GraphQLString }
},
resolve(parent, args) {
}
}
}
});
|
打开服务器的GraphiQL的面板
1
2
3
4
5
6
7
8
9
10
11
12
13
14
15
|
const express = require('express');
const graphqlHTTP = require('express-graphql');
const schema = require('./schema/schema');
const app = express();
app.use('/graphql', graphqlHTTP({
schema,
graphiql: true
}));
app.listen(5000, () => {
console.log('now listening for requests on port 5000, http://127.0.0.1:5000/');
});
|
然后在GraphiQL面板,查询对应book的内容。
1
2
3
4
5
6
7
8
9
10
11
12
13
14
| # Graphiql的查询语句
{
book(id: "1") {
name
}
}
# {
# "data": {
# "book": {
# "name": "Name of the Wind"
# }
# }
# }
|
Graphql提供的类型/方法
GraphQLID,接受query中的字符串或数字类型的参数,转成JavaScript的string类型。
GraphQLInt,number类型。
GraphQLNonNull,使用方式type: new GraphQLNonNull(GraphQLInt),说明该字段的数据类型为int且必填。
关联类型(relative type)
把AuthorType作为BookType的关联类型(实现功能,每本书有个作者)
- 声明一个字段
author,类型为AuthorType
- 在
resolve中,参数parent带有当前query的返回结果,从数据库中查询id等于当前book的authorId的作者信息,作为author的返回值
1
2
3
4
5
6
7
8
9
10
11
12
13
14
15
16
17
18
| const BookType = new GraphQLObjectType({
name: 'Book',
fields: () => ({
id: { type: GraphQLID },
genre: { type: GraphQLString },
name: { type: GraphQLString },
author: {
type: AuthorType,
resolve(parent, args) {
return _.find(authors, {
id: parent.authorId
});
}
}
})
});
|
当关联类型需要返回一个数组
字段books返回BookType的数组,借助GraphQLList。
1
2
3
4
5
6
7
8
9
10
11
12
13
14
15
16
17
18
| const AuthorType = new GraphQLObjectType({
name: 'Author',
fields: () => ({
id: { type: GraphQLID },
name: { type: GraphQLString },
age: { type: GraphQLInt },
books: {
type: new GraphQLList(BookType),
resolve(parent, args) {
return _.filter(books, {
authorId: parent.id
});
}
}
})
});
|
Mutation
数据库model的声明。
1
2
3
4
5
6
7
8
9
|
const mongoose = require('mongoose');
const Schema = mongoose.Schema;
const authorSchema = new Schema({
name: String,
age: Number
});
module.exports = mongoose.model('Author', authorSchema);
|
在GraphQL schema中声明mutationaddAuthor方法,把modelAuthor的实例保存到数据库,且return相应数据。
1
2
3
4
5
6
7
8
9
10
11
12
13
14
15
16
17
18
19
20
21
22
23
|
const Mutation = new GraphQLObjectType({
name: 'Mutation',
fields: {
addAuthor: {
type: AuthorType,
args: {
name: { type: GraphQLString },
age: { type: GraphQLInt }
},
resolve(parent, args) {
let author = new Author({
name: args.name,
age: args.age
});
return author.save();
}
}
}
});
|
在GraphiQL中调用该mutation,执行添加author的操作,且获取添加后的数据结果。
1
2
3
4
5
6
7
8
9
10
11
12
13
14
15
16
|
mutation {
addAuthor(name: "wyy", age: 28) {
name
age
}
}
{
"data": {
"addAuthor": {
"name": "wyy",
"age": 28
}
}
}
|
Client
环境
- React.js
- Apollo系
- apollo-boost
- graphql
- react-apollo
Step 1:连接React component和Apollo Provider
在整个React应用中,通过ApolloClient,打通graphql和react组件的连接。
1
2
3
4
5
6
7
8
9
10
11
12
13
14
15
16
17
18
19
|
import ApolloClient from 'apollo-boost';
import { ApolloProvider } from 'react-apollo';
const client = new ApolloClient({
uri: 'http://localhost:5000/graphql'
});
class App extends Component {
render() {
return (
<ApolloProvider client={client}>
<div>
<h1>hello, world</h1>
<BookList />
</div>
</ApolloProvider>
);
}
}
|
Step 2:graphql query和React组件的数据交互
1.声明graphql query
1
2
3
4
5
6
7
8
9
10
|
import { gql } from 'apollo-boost';
const getBooksQuery = gql`
{
books {
id
name
}
}
`;
|
2.利用Apollo连接gq query和react component
结合react-apollo的graphql,以及刚才声明的query,把请求数据打进BookList的props。
1
2
3
4
5
6
7
| import { graphql } from 'react-apollo';
class BookList extends Component {
}
export default graphql(getBooksQuery)(BookList);
|
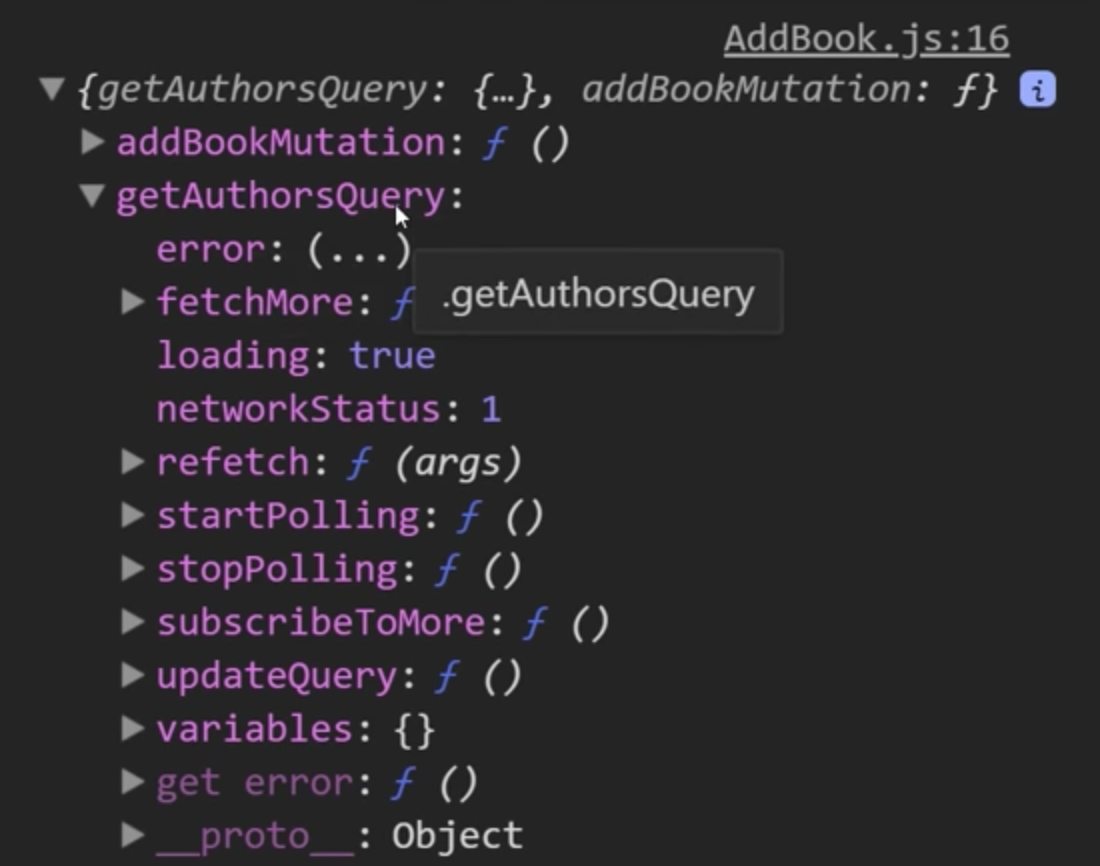
假如,在一个组件内,需要注入多个query,可以利用react-apollo提供的compose方法。
1
2
3
4
5
6
7
8
9
10
| import { graphql, compose } from 'react-apollo';
class BookList extends Component {
}
export default compose(
graphql(gqlQuery1, { name: 'gqlQuery1' }),
graphql(gqlQuery2, { name: 'gqlQuery2' }),
)(BookList);
|

3.通过this.props.data获取请求数据
在server的graphiQL查询的数据结构如下。
1
2
3
4
5
6
7
8
9
10
| {
"data": {
"books": [
{
"id": "5b374cdd5806e47eefce3734",
"name": "test"
}
]
}
}
|
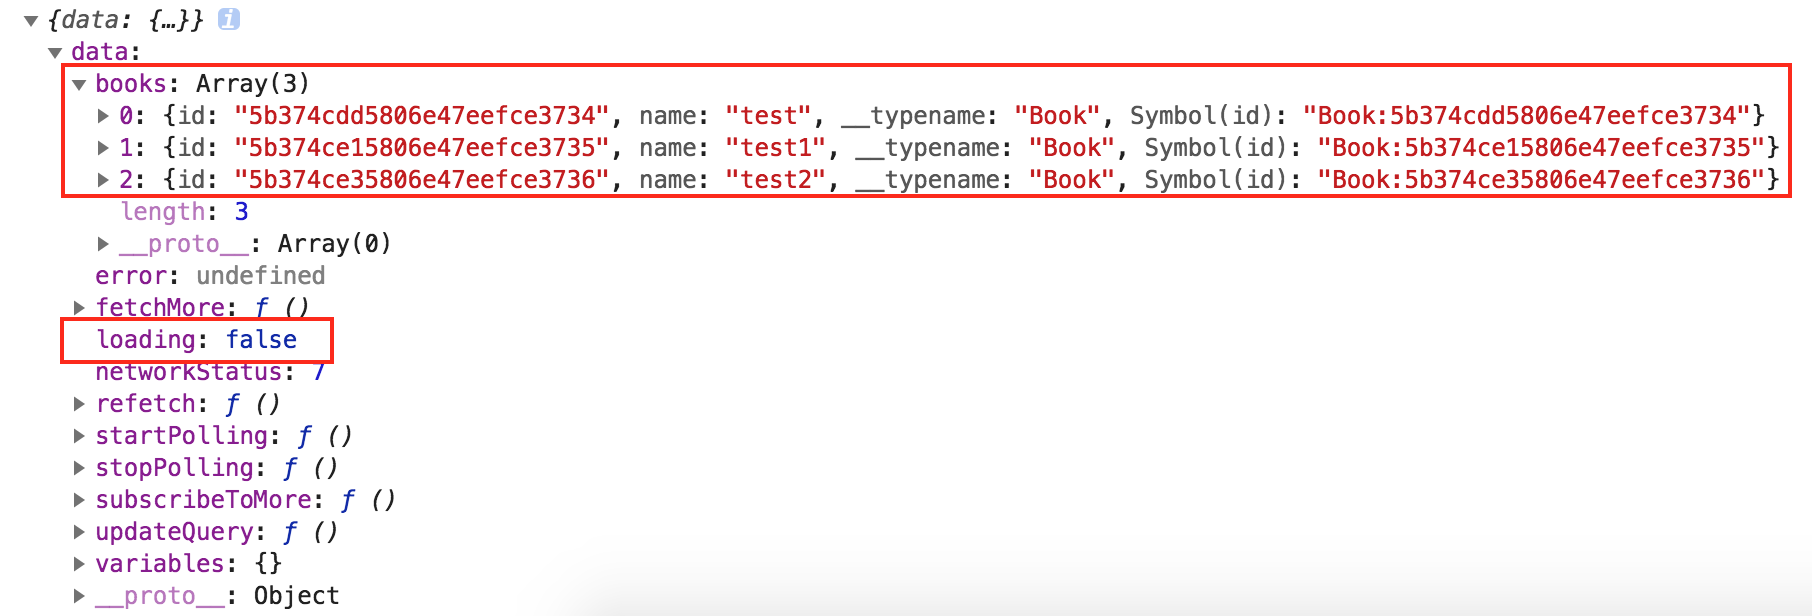
在render输出client的this.props.data,可以发现props更新了两次。区别在于loading这个字段,这也可以作为一个判断的flag,当loading为true时,再进一步分析接口返回的数据结构。
第一次,loading为true,没有books这个字段。

第二次,loading为false,而books返回了一个数组。

4. Mutation
i. query的声明
值得注意的是,当调用mutation时,我们可能需要传入参数,如何获取从react组件传入的参数?可以利用query variables(query变量)实现。
1
2
3
4
5
6
7
8
9
|
const addBookMutation = gql`
mutation($name: String!, $genre: String!, $authorId: ID!) {
addBook(name: $name, genre: $genre, authorId: $authorId) {
name
id
}
}
`
|
ii. react component的数据交互
利用react-apollo的compose,把addBookMutation注入到this.props,通过varibales传入query变量。
而当我们希望在mutation之后重新获取某个query的数据时,可以在mutation操作中添加refetchQueries的回调。
1
2
3
4
5
6
7
8
9
10
11
12
13
14
|
addBook() {
this.props.addBookMutation({
variables: {
name: formData.name,
genre: formData.genre,
authorId: formData.authorId,
},
refetchQueries: [{
query: anotherQueryWantedToBeRefetched
}]
})
}
|
5. Query
需要从组件传入参数,进行参数查询的gql query(引入query变量)。
1
2
3
4
5
6
7
8
9
10
11
12
13
14
15
16
17
18
19
|
const getBooksQuery = gql`
query ($id: ID!) {
book(id: $id) {
id
name
}
}
`;
export default graphql(getBookQuery, {
options: props => ({
variables: {
id: props.id
}
})
})(getBookComponentName);
|
Tips
问 为什么在声明GraphQLObjectType实例时,fields不直接使用对象,而使用了函数?
答 因为js的执行时机,直接使用对象的话,代码从上往下执行,fields中引用别的类型,如BookType和AuthorType有互相引用,会报错BookType或者AuthorType undefined。而使用函数的话,执行到函数内部逻辑时,外部的声明已经完成了。


